Configuring Cloudflare for a Heroku application
Cloudflare is a brilliant service, and I’ve been using it for personal use for a couple of years now. In particular, its universal SSL, CDN, and always online capabilities have really come in handy.
I use Cloudflare for my personal domain, and frequently build little toy applications that I usually host on Heroku free tier dynos. Because of how Heroku suggests that DNS records are set up, there are a couple of tips that I wanted to write about today. Overall, this post focusses on setting up a application hosted on Heroku on a subdomain. If you also want to have your application available on the root record of your domain, I outline how to do this at the end of the post.
The thing to be aware of with Cloudflare is that it completely takes over your domain to offer the capabilities it does. This means that your DNS records and managed and resolved by Cloudflare, as well as caching, SSL, etc. The difference between configuring an app in Cloudflare and with a “normal” DNS provider is that you do need to get all the settings correct for everything to work together.
The first thing to be aware of is where to direct your DNS records towards. If you follow Heroku’s guide, they will instruct you to specify a CNAME record against the subdomain which you wish to use, directed at “subdomain.your-domain.herokudns.com” (for example, “www.joshmcarthur.com.herokudns.com”). This is to allow Heroku to provision and serve an LetsEncrypt SSL certificate for the domain(s) you have configured. If you direct Cloudflare towards this domain though, you’re likely to run into redirect loops, or even find that Heroku is unable to find your app. For your app to resolve correctly, you should instead direct your subdomain at a CNAME record of your normal .herokuapp.com domain - for example, “www-joshmcarthur-com.herokuapp.com”.

Once your CNAME is correct, you will need to configure SSL for your application. At this point, if
your application is set up to force SSL in production (in Rails, this is config.force_ssl = true,
in Phoenix this is config :my_app, MyApp.Endpoint, force_ssl: true), then you might have a redirect loop going on. This is because the default with Cloudflare is to use ‘Flexible’ SSL. This means that the network connection is doing something like:
- “https://test.domain.com” (Cloudflare) -> “http://test-domain-com.herokuapp.com” (Heroku) -> “https://test.domain.com” (Redirect from app forcing SSL) - repeated over and over.
In other words, flexible SSL will connect to your origin (Heroku), via HTTP. The protocol that your app will see in the headers will be “http”, so it will change the protocol to “https” and redirect - letting the same flow occur over and over again.
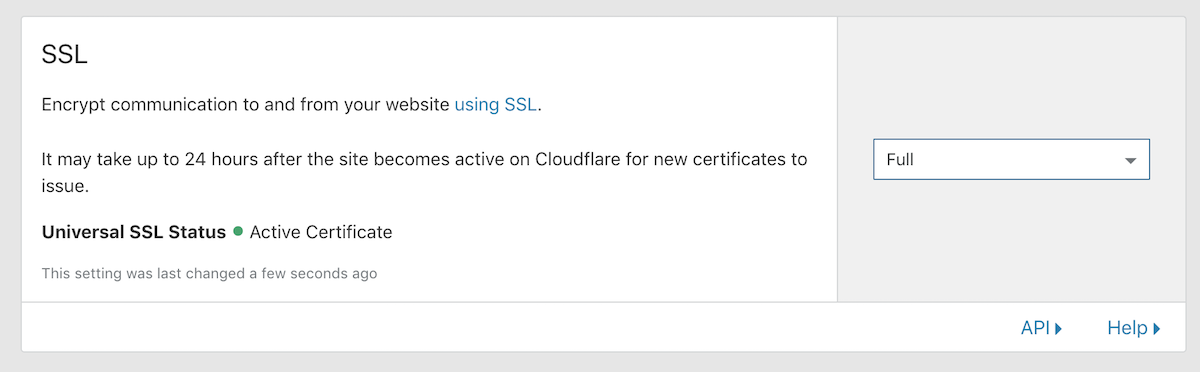
To resolve this problem, simply change the SSL mode (under the “Crypto” tab in Cloudflare) to “Full” - or even “Full (Strict)” if you want to be extra good. The ‘Full’ SSL mode means that Cloudflare will connect to your origin via HTTPS instead of HTTP, and your application will not need to perform a redirect to a secure origin, since the request is already secure. The difference between ‘Full’ and ‘Full (Strict)’ is simply that ‘Full’ accepts any SSL certificate, even if it is self-signed, expired, or has some other problem. ‘Full (Strict)’ requires that the certificate is valid for the domain, is from a trusted issuer, and has not expired.
With these two configurations in place, you should have your application functioning via SSL on your subdomain of choice. You can have a play around with different cache and perfomance settings if you wish, though I’ve found the defaults here to work well for me.
If you just needed to configure a subdomain here, then you can stop reading - you’re done! If you would like your domain root to also serve your application, there’s just a couple more configurations you should put in place to get this working.
The first is a DNS change specific to Cloudflare (well, specific-ish, several DNS providers support something similar) called “CNAME flattening”. CNAME flattening means that you can specify a CNAME record on the root of your domain (this is not normally valid, normally an ‘A’ record is used, and ‘A’ records must be an IP address which Heroku does not support). When a client asks Cloudflare what the domain root record should resolve to, Cloudflare will resolve the domain configured as the CNAME to an IP address, and return this as an ‘A’ record. This allows for autoscaling services like Heroku, Cloudfront, and AWS ELB to be specified as the root record of a domain - all of these services use a full hostname to the endpoint, but autoscale servers in the background. With CNAME flattening, it will not matter what IP address these hostnames have, Cloudflare will figure it out and ‘follow’ them as they scale.
For your root domain record, the easiest thing you can do is specify a CNAME of the subdomain you configured earlier - for example setting the CNAME record of “joshmcarthur.com.” to “www.joshmcarthur.com.”. Setting this value means that if you change where your subdomain points to, your root record will follow that setting automatically. Once that setting is applied, you should be able go to your domain, and see your app - still available via SSL. Neat!
If you’re like me though, you really only want your app to be available on one particular hostname -
normally www.myapp.com. Luckily, Cloudflare supports “Page Rules” which you can use to redirect
requests - this means that you can put a Page Rule in place that will redirect any requests to your
root domain to your subdomain. This redirect will be marked with a 301 Permanent Redirect status,
which means that client browsers will cache and remember to just go straight to your subdomain next
time. To add a Page Rule, go to the “Page Rules” tab, and select the option to create a new rule.
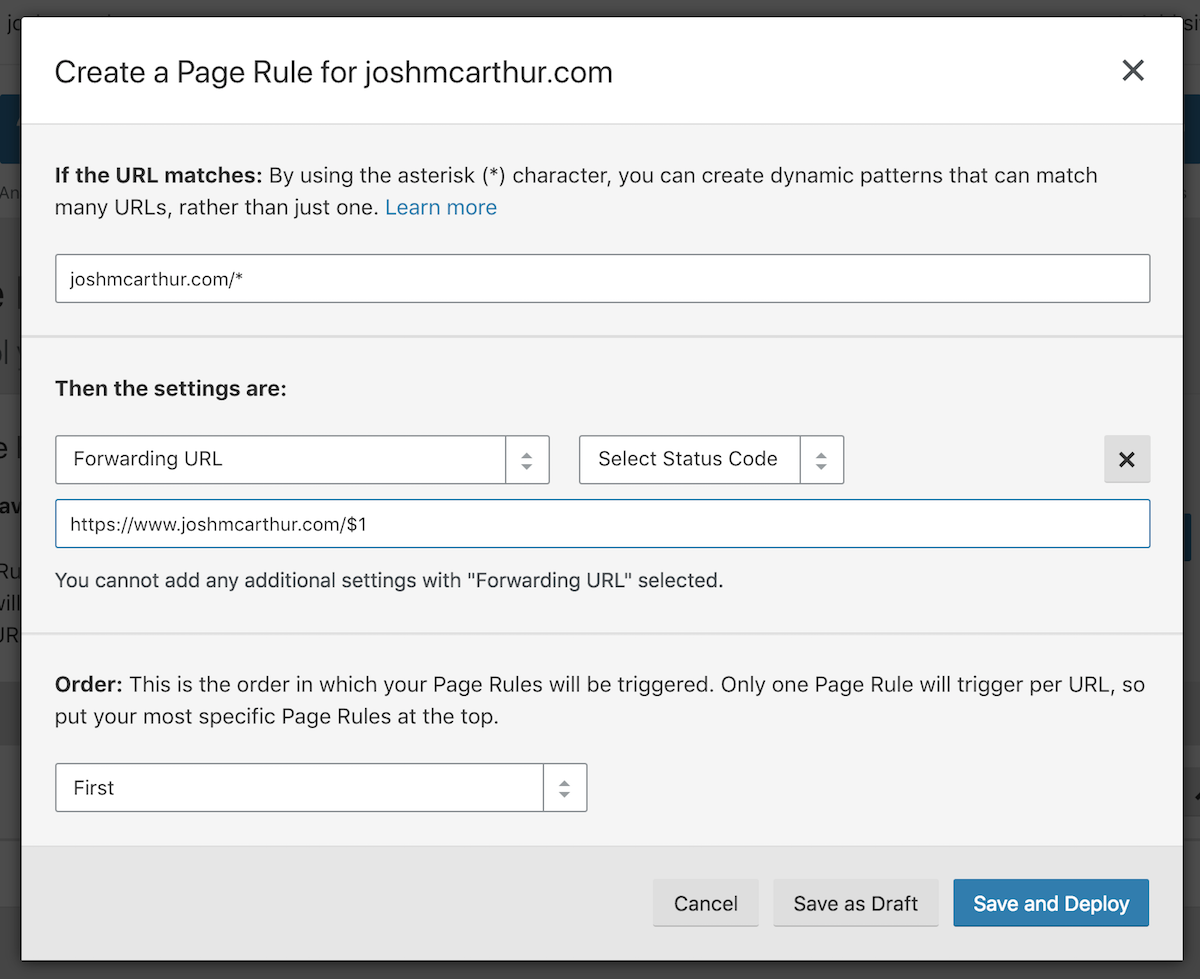
The first thing to provide is the pattern that the URL must match for the rule. You’ll want to enter
mydomain.com/*, which will match your domain without any subdomain, with any path. You can then
add one or more settings - we will just need one today, but you can add many settings to your rules
to change how different URLs will behave. After clicking on ‘Add Setting’, select a setting type of
‘Forwarding URL’, and select ‘301 - Permanent Redirect’ as the status code. The destination URL
should be your subdomain that you’d like to use, followed by ‘$1’ - the ‘$1’ will be replaced with
the wildcard value you specified in the pattern, which will be the path the client is going to. An
example of a destination URL would be “https://www.joshmcarthur.com/$1”.
The complete rule definition should look something like:
With these steps complete, you’ve achieved the following:
- Heroku app available on a subdomain - e.g. www.joshmcarthur.com -> www-joshmcarthur-com.herokuapp.com
- SSL available on both root and subdomain. SSL is forced by the Heroku app.
- Root domain forwards to www subdomain - e.g. joshmcarthur.com -> 301 www.joshmcarthur.com.
Nice!